Why Great Editing Begins at the Camera
In real estate photography, the final image is almost always a product of careful post-processing. Because cameras cannot replicate the vast dynamic range of the human eye, capturing a room with both dark corners and bright windows requires advanced digital blending. However, many photographers make the mistake of thinking they can "fix it in Photoshop" without planning their shots on-site.
The truth is, the quality of your final edit is directly limited by the data you capture in your camera. Choosing the right camera body, using optimal exposure settings, and shooting in a format that preserves shadow and highlight details are crucial steps to ensuring your raw files edit like a dream. Whether you do your own editing or work with professional real estate photo editing services, setting up your gear correctly makes all the difference.
Editor's Note (From the Digihomestudio Team): After processing millions of exposures for real estate listings, our editing team has found that files captured with the correct in-camera settings (specifically lossless RAW and a locked low ISO) reduce edit times by up to 40% and yield significantly cleaner color tones.
Let's dive into the best cameras for real estate photography in 2026 and the exact settings you need to capture perfect raw data.
1. The Best Cameras for Real Estate Photography in 2026
To achieve professional listing photos, you need a camera that excels in dynamic range, low-light performance, and lens versatility. Here are the leading mirrorless cameras recommended for real estate in 2026:
Summary Camera Comparison
| Camera Model | Sensor Size | Megapixels | Dynamic Range | Key Editing Advantage |
|---|---|---|---|---|
| Sony Alpha 7 IV | Full-Frame | 33 MP | ~14.7 stops | Lossless compressed RAW files are clean and noise-free. |
| Canon EOS R6 Mark III | Full-Frame | 24.2 MP | ~14.5 stops | Outstanding color accuracy in shadows. |
| Nikon Z6 III | Full-Frame (Stacked) | 24.5 MP | ~14.8 stops | Fastest bracketing; superb highlights retention. |
| Canon EOS R5 Mark II | Full-Frame | 45 MP | ~14.6 stops | High resolution allows for cropping without loss of clarity. |
| Fujifilm X-T5 | APS-C (Crop) | 40.2 MP | ~13.5 stops | High-resolution budget option with excellent native lenses. |
Sony Alpha 7 IV (The Industry Workhorse)
The Sony a7 IV remains the most popular camera body among real estate professionals. Featuring a 33-megapixel full-frame sensor, it strikes the perfect balance between high resolution and file size. Editors love its lossless compressed RAW format, which provides incredible latitude for shadow recovery in dark corners without introducing digital noise. Its Auto Exposure Bracketing (AEB) setup is also incredibly robust and quick to configure.
Canon EOS R6 Mark III (The Hybrid Powerhouse)
Released in late 2025, the Canon EOS R6 Mark III is the latest mid-range champion. It is an outstanding hybrid camera for photographers who offer both high-quality stills and video walkthroughs. Its sensor provides exceptional low-light performance, and the colors in its RAW files remain clean and accurate even when you retrieve details from heavy shadows.
Nikon Z6 III (Best Dynamic Range for Interiors)
Nikon has long been praised for its sensor dynamics, and the Z6 III takes this a step further with its partially-stacked sensor. For real estate photographers, this means exceptional detail retention in high-contrast situations. When shooting a room with direct sunlight pouring through a window, the Z6 III allows you to preserve both the interior texture and the exterior view with minimal effort.
Canon EOS R5 Mark II (The Luxury & Commercial Choice)
If you specialize in high-end luxury estates or commercial properties, the 45-megapixel Canon EOS R5 II is the flagship choice. The high pixel count allows you to crop into wide shots to highlight specific architectural details without losing clarity. It also features top-tier video capabilities (up to 8K resolution), which is ideal for high-production-value property tours.
Fujifilm X-T5 (The Best Budget Crop-Sensor Option)
While full-frame is the industry standard, the Fujifilm X-T5 is a formidable APS-C (crop-sensor) option. Boasting a 40-megapixel sensor and a compact design, it delivers extremely sharp images at a fraction of the cost of full-frame systems. Paired with a quality ultra-wide lens, it is an excellent starting point for new real estate photographers.
2. Recommended Real Estate Photography Camera Settings
Even the most expensive camera will produce mediocre results if your settings are incorrect. To prepare your images for professional exposure blending, HDR, or virtual twilight conversion, configure your camera with these settings:
Shoot Exclusively in RAW
If you shoot in JPEG, the camera compresses the image and discards up to 80% of the color and exposure data. If you try to brighten a dark ceiling or darken a blown-out window in a JPEG, you will get pixelation, banding, and mud. Shooting in RAW (specifically uncompressed or 14-bit lossless compressed RAW) preserves all the details your sensor captures, allowing editors to seamlessly correct exposure.
Set Up Auto Exposure Bracketing (AEB)
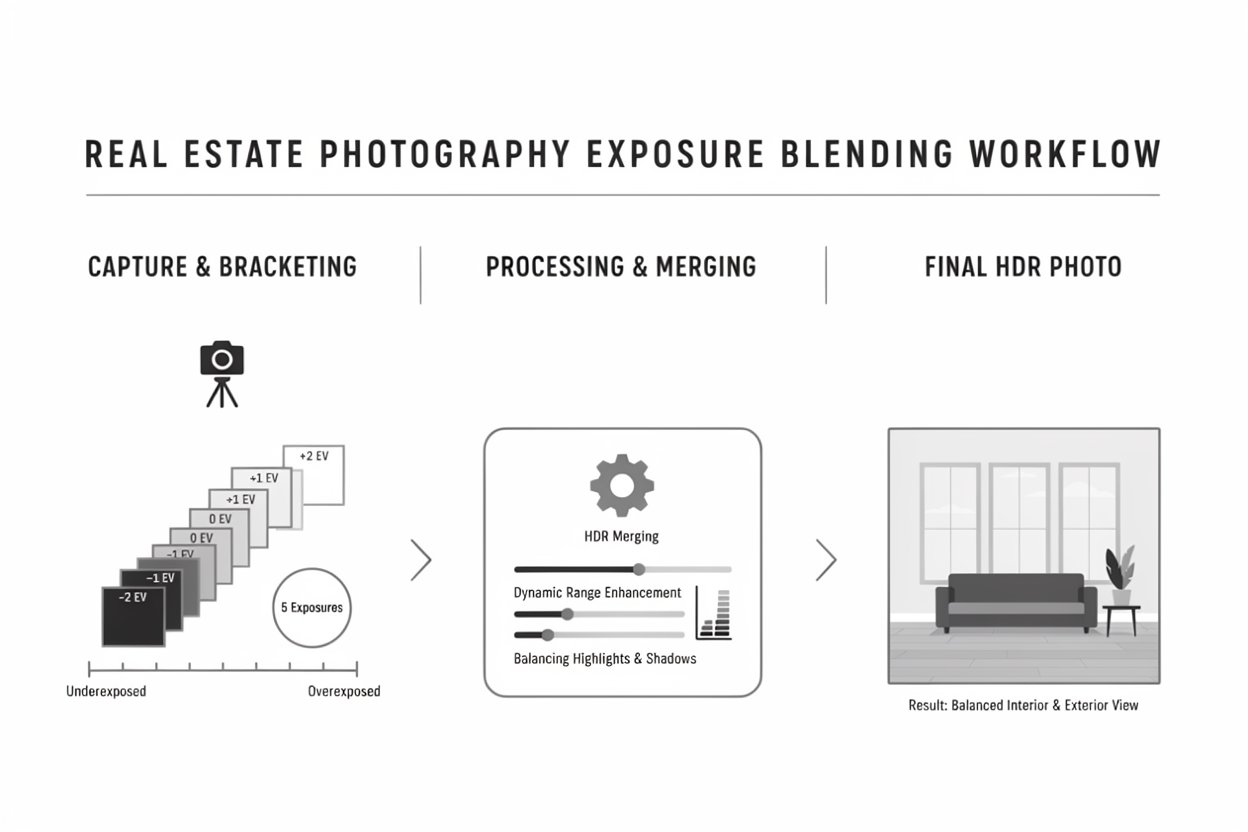
Because a single frame cannot capture both a dark fireplace and a bright sunny window, you must shoot in "brackets" (a technique where you capture multiple photos of the same scene at different exposures). Configure your camera's AEB to capture a sequence of different exposures:
- For standard rooms: Shoot 3 brackets at 2-stop intervals (-2 EV, 0 EV, +2 EV).
- For high-contrast rooms (e.g., shooting directly into bright windows): Shoot 5 brackets at 2-stop intervals (-4 EV, -2 EV, 0 EV, +2 EV, +4 EV).
These brackets are later merged using HDR software or manual layer masking in Photoshop to create a single, perfectly exposed image.
Lock Your Aperture (f/8 to f/11)
To keep the entire room sharp—from the kitchen island in the foreground to the backsplash in the background—use an aperture between f/8 and f/11. This is the "sweet spot" for most wide-angle lenses, providing deep depth of field and maximum corner-to-corner sharpness without causing lens diffraction (which blurs details when using very small apertures like f/22).
Keep ISO Low (ISO 100 to 400)
To prevent grain and color noise from ruining your photos, lock your ISO at its native base (usually ISO 100). Higher ISO settings degrade the dynamic range of your sensor, making it harder to clean up shadows in post-production. Since you should always shoot real estate on a sturdy tripod, a slower shutter speed is perfectly fine to compensate for low light.
Manage White Balance (AWB vs. Kelvin)
Mixed lighting is one of the biggest challenges in real estate photography. You often have warm light from indoor lamps (3000K) mixed with cool daylight from windows (5500K). While Auto White Balance (AWB) is a good starting point, setting your white balance manually (e.g., locking it at 4500K–5000K) ensures color consistency across all photos in a home. For photographers who prefer advanced lighting setups, pairing these camera settings with the mastering the flambient method will produce even cleaner, glare-free colors.
3. How Gear and Settings Impact Your Editing Workflow
When your hardware and camera settings are aligned, the editing process becomes significantly faster and higher quality:
- Cleaner Shadow Recovery: With a modern full-frame sensor and low ISO RAW files, editors can pull detail out of dark corners without introducing ugly colored noise. (For a deep dive into lighting corrections, see how shadow removal elevates real estate photos).
- Fewer Editing Mistakes: Clean exposures prevent common editing issues such as color shifts, over-saturation, and haloing. If you're editing your own shots, watch out for these 11 photo editing mistakes you should avoid.
- Seamless Drone Integration: Matching the color and exposure brackets of your ground camera with your drone camera ensures consistent marketing materials. To learn how aerial shots elevate listing appeal, read about how drone photography transforms real estate, and for the post-shoot side see editing drone photos for listings.
4. Real Estate Photography Camera Settings FAQ
What is the best camera sensor size for real estate photography?
Full-frame mirrorless cameras are the industry standard for real estate photography. Full-frame sensors offer superior dynamic range (essential for capturing bright windows and dark shadows simultaneously) and better low-light performance compared to crop (APS-C) sensors.
What aperture should I use for interior photos?
You should lock your aperture between f/8 and f/11. Shooting in this range ensures corner-to-corner sharpness and maximum depth of field, keeping both the foreground furniture and the background walls crisp.
Should I use RAW or JPEG for real estate listings?
Always shoot in RAW. RAW files preserve uncompressed, 14-bit sensor data, giving you or your editing team the dynamic range required to blend exposures and recover details. JPEG files discard up to 80% of this data, resulting in color banding and noise when edited.
How many brackets are needed for exposure bracketing?
For standard rooms, 3 bracketed exposures at 2-stop intervals (-2, 0, +2 EV) are sufficient. For high-contrast spaces (such as a room with a large, bright window facing the sun), shoot 5 bracketed exposures at 2-stop intervals (-4, -2, 0, +2, +4 EV).
Conclusion: Set Up for Success
Success in real estate marketing is about efficiency and quality. By investing in a capable mirrorless system and locking in the correct settings—shooting RAW, utilizing exposure bracketing, and keeping your ISO low—you lay the groundwork for stunning, professional photos.
If you find yourself spending too many hours in front of a computer screen blending brackets and correcting colors, consider outsourcing your editing workflow. Focus your time on shooting more properties and growing your client base, and let the experts handle the pixel work. Explore Digihomestudio's Professional Real Estate Photo Editing Services to see how we can turn your bracketed raws into listing-ready masterpieces.