Introduction
Virtual decluttering is essential for transforming occupied or cluttered properties into buyer-focused listing assets. But achieving professional, MLS-compliant results requires following a precise, sequential workflow that ensures geometric accuracy, lighting consistency, and seamless texture reconstruction.
This guide outlines the exact 5-step process used by professional real estate photo editors to remove objects while maintaining architectural integrity and avoiding costly revisions.
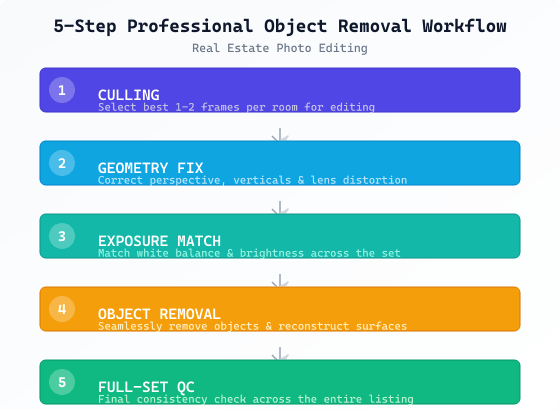
The 5-Step Professional Object Removal Workflow
Why This Order Matters
Each step builds upon the previous one, and attempting to perform steps out of sequence guarantees rework and wasted effort:
- Culling first ensures you're only editing the best frames, saving time on images that won't be used
- Geometry fixes before color prevents having to re-crop and re-saturate after horizon adjustments
- Exposure matching before object removal ensures you're removing objects from properly lit and balanced images
- Object removal before final QC allows the quality check to catch any reconstruction issues across the full set
- Full-set QC last guarantees consistency between all images in the listing, preventing jarring variations
Step-by-Step Breakdown
STEP 1: Culling
- Review all bracketed shots for each room
- Select 1-2 frames with best composition, lighting, and minimal occlusion
- Flag any severely problematic images for reshoot consideration
- Output: Curated set of 1-2 optimal frames per room ready for editing
STEP 2: Geometry Fix
- Straighten horizontal and vertical lines using perspective correction
- Ensure horizon is level and verticals are truly vertical
- Apply lens correction for barrel/pincushion distortion
- Crop to final aspect ratio while maintaining key architectural elements
- Output: Geometrically corrected images with straight lines and proper composition
STEP 3: Exposure Match
- Match white balance to ground-level shots (typically living room/kitchen)
- Adjust brightness and contrast to create consistent lighting across the set
- Ensure shadows and highlights appear natural and directional
- Verify no color casts from mixed lighting sources
- Output: Images with consistent color temperature and exposure levels
STEP 4: Object Removal
- Segment target objects using precise masking or path tools
- Reconstruct underlying surfaces (floors, walls, baseboards) using texture cloning
- Remove reflections and shadows cast by removed objects
- Ensure reconstructed areas match surrounding texture, grain, and lighting
- Output: Images with objects seamlessly removed and underlying surfaces properly reconstructed
STEP 5: Full-Set QC
- Compare all images in the listing for consistent:
- Horizon level and vertical alignment
- White balance and color temperature
- Brightness and contrast levels
- Texture quality and reconstruction accuracy
- Lighting direction and shadow consistency
- Verify no permanent defects were accidentally removed
- Ensure MLS compliance through adherence to removal guidelines
- Output: MLS-ready, consistent image set that accurately represents the property
Quality Control Checkpoints
At the end of each step, professional editors perform these quick validations:
After Culling: Confirm 1-2 best frames selected per room, no usable frames accidentally discarded
After Geometry Fix: Verify horizon level (±0.5°), verticals plumb, no excessive cropping of key features
After Exposure Match: Check WB consistency using gray card or neutral surfaces, brightness within ±15% tolerance
After Object Removal: Inspect at 200% zoom for seamless texture, no clone patterns, proper lighting reconstruction
After Full-Set QC: Run automated comparison tools plus manual review for listing-wide consistency
Common Workflow Mistakes to Avoid
❌ Doing exposure matching after object removal - Causes you to redo removal work when colors shift
❌ Skipping geometry fixes - Leads to tilted horizons and converging verticals that scream "fake edit"
❌ Performing QC after each image instead of full-set - Misses inconsistencies between images in the same listing
❌ Removing objects before culling - Wastes time editing frames that won't be used in the final listing
❌ Using inconsistent reference images for exposure - Creates jarring variations between rooms in the same property
Tools and Techniques by Step
| Step | Primary Tools | Key Techniques | Time Investment |
|---|---|---|---|
| 1 - Culling | Adobe Bridge, Lightroom, Photo Mechanic | Rating systems, flagging, comparison views | 2-5 min per room |
| 2 - Geometry Fix | Photoshop Lens Correction, Transform tools | Perspective crop, vertical/horizontal guides | 3-8 min per image |
| 3 - Exposure Match | Photoshop Camera Raw, Match Color | Gray card sampling, histogram matching | 2-4 min per image |
| 4 - Object Removal | Photoshop Clone Stamp, Healing Brush, Content-Aware Fill | Frequency separation, texture cloning, reflection removal | 8-25 min per image* |
| 5 - Full-Set QC | Adobe Bridge, specialized QC plugins | Side-by-side comparison, automated difference detection | 3-6 min per listing |
*Time varies significantly based on object size, floor complexity, and reflective surfaces
Workflow Optimization Tips
- Batch similar steps: Process all images for Step 2 (geometry) before moving to Step 3 (exposure) for the entire listing
- Use actions and presets: Create Photoshop actions for repetitive geometry and exposure adjustments
- Leverage AI assistance: Use AI masking tools for initial object segmentation in Step 4, then refine manually
- Create template files: Save PSD templates with common room layouts for faster reconstruction in Step 4
- Implement version control: Save work after each major step to easily revert if needed without losing all progress
When to Iterate Between Steps
While the workflow is designed to be sequential, certain conditions may require stepping back:
- From Step 4 to Step 2: If object removal reveals severe perspective issues not visible with objects in place
- From Step 4 to Step 3: If reconstructed areas show significant exposure mismatches after texture work
- From Step 5 to Step 4: If QC reveals reconstruction flaws in specific images requiring rework
- From Step 5 to Step 3: If exposure inconsistencies are detected across the set requiring global adjustment
However, frequent backward movement indicates issues with the initial culling or preparation stages.
MLS Compliance Throughout the Workflow
Each step has specific compliance considerations:
Step 1 - Culling: Never discard images that show defects you later plan to "fix" in editing
Step 2 - Geometry: Perspective correction must not conceal or create false spatial relationships
Step 3 - Exposure: Adjustments must reflect actual lighting conditions, not invent or remove light sources
Step 4 - Removal: Only remove temporary/occupant items per MLS guidelines; never remove permanent fixtures or defects
Step 5 - QC: Final check specifically verifies no MLS violations were introduced during editing
Conclusion
The 5-Step Professional Object Removal Workflow isn't just a suggestion—it's the proven sequence that delivers consistent, MLS-compliant results while minimizing wasted effort. By following this order, editors ensure that:
- Time is spent only on images that will actually be used
- Each step builds on a properly prepared foundation
- Quality control catches issues at the right level (per-image vs. listing-wide)
- The final product accurately represents the property while showcasing its best features
Real estate photographers and editors who internalize this workflow produce higher quality work in less time, with fewer revisions and greater client satisfaction. Remember: in professional real estate photo editing, sequence is just as important as skill.
Ready to implement this workflow? Start with a 3-image test set using these exact steps, then scale to your full listing workflow once you've verified the process delivers consistent, compliant results.